
This is a bias cut Vionnet 1/2 scale dress I draped this afternoon.
I started with the design lines. I mapped out every seam I needed to create.
Use draping tape or masking tape to create these lines.


Next you will need to cut and mark four pieces of fabric.
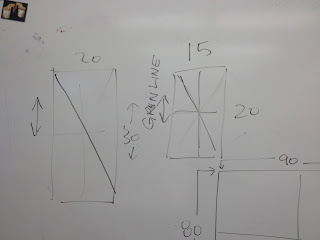
Please note that these are 1/2 scale measurements.
One piece 20 cm x 20 cm,
20 cm x 30 cm
15 cm x 20 cm
80 cm x 90 cm
Mark the grain line on all the pieces by adding a line down the middle.
Create a cross grain by adding a line in the center of the piece.
Now create the bias line by drawing a diagonal line from corner to corner intersecting the center.
It is best to do these lines in three different colors.


Start with the 20 cm x 20 cm
The red is the grain line,
Black is cross grain,
Dotted is bias.

Pin onto bust with the bias line parallel to center front.
Pin down center front.

Smooth along neck line and clip in, but not past to create a smooth shape.
Pin at the highest point of the shoulder and smooth down pinning to the armhole.
Smooth down the armhole pinning along the way.
Pin down side seam pushing fabric forward to create dart.

Pinch fabric and pin creating a dart over the design line.

Mark all of the lines very well.
Mark anywhere there is an intersection.

Trim down, leaving 1 cm seam allowance
Next, we are using the 15 cm x 20 cm piece.
Mark 3.5 cm over, fold under and pin to center front.
Pin down center front and around design lines.
You may need to un-pin part of the piece you just created.

Mark all of the lines very well.
Mark anywhere there is an intersection.
Trim down, leaving 1 cm seam allowance

This is what it should look like.

Now we are working with the 20 cm x 30 cm piece.

Mark 4.5 cm over from center bias line.
Pin that line down center back.
Smooth along neck line and clip in, but not past to create a smooth shape.
Pin at the highest point of the shoulder and smooth down pinning to the armhole.
Smooth down the armhole pinning along the way.

Trim in to bottom edge but not past the design lines.
Pin along the bottom design line smoothing the fabric out as you go.


Mark all of the lines very well.
Mark anywhere there is an intersection.
Trim down, leaving 1 cm seam allowance

This should be what we have now.


Now we are working with our final piece.
Pin the intersection 19 cm up at the waist line.

Pin top part of design lines and draw on marking all intersections.
Trim down front line with 1 cm seam, this will cause fullness to the skirt.
Be sure to have a very clear corner.


Clip into corner for best shape.


Play around with the drape of the front of the skirt.


Clip into but not past the edge of the design line.
Clipping will help create a smoother line.


Use a scrap piece of fabric and pin it to cf, leaving 1 cm for seam allowance.
This will become the front panel of the skirt.
Pin fabric along design line, clipping into but not past to create a smooth shape.
Pin front skirts together and create a piece that drapes evenly.
If the drape if off, adjust the seam.


Mark all of the lines very well.
Mark anywhere there is an intersection.
Mark notches very 3 cm to insurance perfect fit on curves.
Trim down, leaving 1 cm seam allowance
True the hem of the skirt.
Now it is time to take it off the mannequin and create pattern pieces.


Un-pin all pieces and lay flat on paper.
I tape my pieces down so they do not move.
Use a tracing wheel or awl to trace off pattern pieces.
Trace all design lines and turn intersection marks into notches.


This is what the bodice pieces look like.
Of course if you were wanting to make this dress for your self, you need to recalculate the fabric amounts and mirror the necessary pieces.


No comments:
Post a Comment